
Introduction
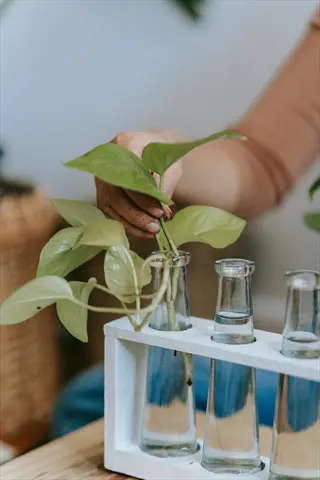
I love watching a tiny white root push out from a snipped stem. The Plant Propagation: Complete Beginner Guide below shows you how. You drop a cutting in water. You set the jar on a sunny shelf. Nature does the rest while you sip coffee.
NC State Extension says propagation is both art and science. They call it a skill that needs hands-on work. I have killed many cuttings. Each soggy failure taught me more than any book.
Most guides skip the why for new readers. Here is the truth: 66% of Americans now own houseplants. Plant swaps fill weekend plans in many cities. Plant propagation lets you turn one pothos into a dozen gifts. You can share rare plants with friends and skip the boutique price tag.
Think of it as the photocopier of the plant world. The copies grow, breathe, and often beat the parent. You will use sexual propagation with seeds for variety. You will use asexual propagation with cuttings for exact clones. A few clever propagation methods sit in between for multiplying plants with no cash.
Native plant interest has grown for over 30 years. The USDA Forest Service now holds nearly 3,000 protocols. Below you will find the seven core vegetative propagation methods. You also get a decision framework, beginner plant picks, and fixes for the mistakes that trip up most new folks.
7 Methods of Plant Propagation
Most guides bury the seven methods under thick walls of text. I will lay them all out flat. You can scan and pick the one that fits your plant and skill level.
Think of seed propagation as the baby photo of a plant. The new plant looks a bit like both parents but it brings fresh traits. Stem cuttings and other clone methods work like a fingerprint copy. The new plant matches the parent in every single way.
Rooting hormones make many of these methods work better. Missouri Extension lists three main types: IAA, IBA, and NAA. The USDA Native Plant database now holds nearly 3,000 protocols built up since 2001. That is a lot of plant know-how at your fingertips.
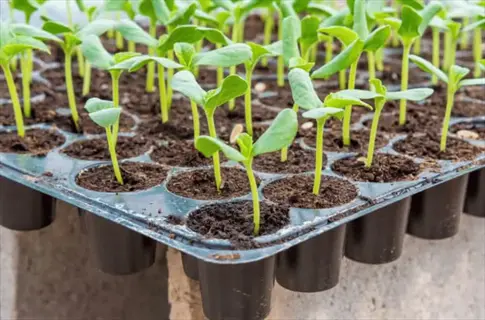
Seed Propagation
- Definition: Growing new plants from seeds produced by flowering parent plants through pollination and fertilization processes.
- Ideal plants: Tomatoes, basil, marigolds, lettuce, sunflowers, and most annual vegetables or wildflowers grow well from seed.
- Time to germinate: Quick crops sprout in 5 to 7 days while slow crops can take 21 days or more.
- Difficulty: Easy for most vegetables but moderate for trees and shrubs that require dormancy treatments like stratification.
- Equipment needed: Seed trays, sterile starting mix, plastic dome, and 14 to 16 hours of daily light per Missouri Extension.
- Beginner tip: Start with quick germinating crops like radishes or basil to build confidence before tackling slow growing perennials.
Stem Cuttings
- Definition: Taking a section of stem from a parent plant and rooting it in water, soil, or another medium.
- Ideal plants: Pothos, philodendron, coleus, geraniums, rosemary, hydrangea, and most soft-stemmed houseplants root reliably.
- Time to root: Soft cuttings root in 2 to 4 weeks while hardwood cuttings take 8 to 16 weeks.
- Difficulty: Easy and the most popular method; NC State recommends 4 to 6 inch (10 to 15 centimeter) sections.
- Equipment needed: Clean shears, rooting medium, optional rooting hormone, and a humidity dome to maintain moisture.
- Beginner tip: Choose a healthy non-flowering stem with at least two nodes and remove lower leaves before inserting.
Leaf Cuttings
- Definition: Rooting a single leaf or leaf with petiole to generate a whole new plant from foliar tissue.
- Ideal plants: Per UF/IFAS, African violets, hoyas, peperomias, snake plants, and large-leaved begonias propagate from leaves.
- Time to root: New plantlets appear in 4 to 8 weeks after sticking the leaf into moist medium.
- Difficulty: Moderate because only specific plant families regenerate from leaves; most species fail this method completely.
- Equipment needed: Sharp knife, vermiculite or perlite, and a covered tray to trap humidity around the leaf.
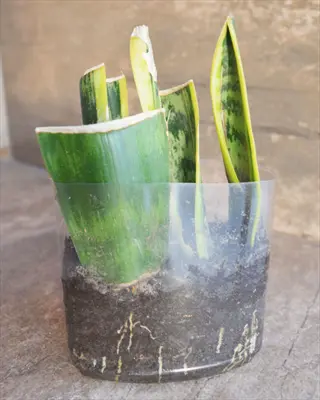
- Beginner tip: Try a snake plant leaf section sliced into 2 inch (5 centimeter) pieces planted upright for easy results.
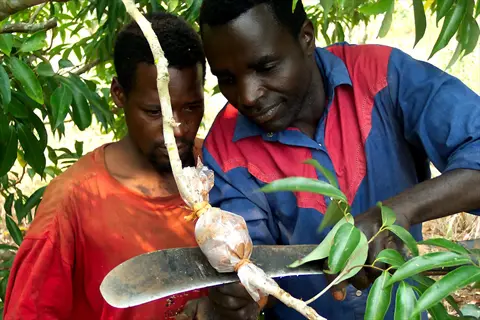
Layering
- Definition: Rooting a stem while it remains attached to the parent plant, then separating after roots form.
- Ideal plants: Strawberries, raspberries, magnolias, rhododendrons, rubber plants, and pothos respond well to layering techniques.
- Time to root: Simple layering takes 4 to 12 weeks; air layering on woody plants needs 8 to 16 weeks.
- Difficulty: Easy to moderate; the parent feeds the new plant until roots form, giving high success rates.
- Equipment needed: Sphagnum moss, plastic wrap, twist ties for air layering, or soil and stakes for simple layering.
- Beginner tip: Try natural layering with a spider plant runner pinned into a nearby pot of soil for guaranteed success.
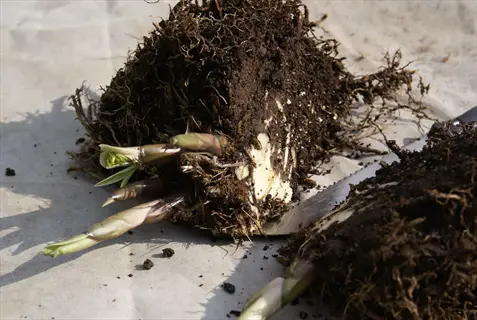
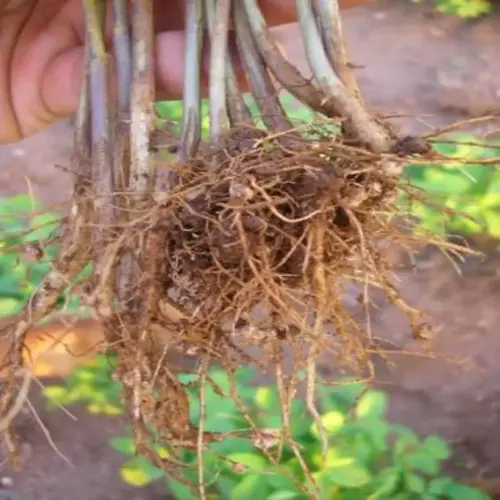
Division
- Definition: Separating a mature plant into multiple sections, each with roots and shoots, to create independent new plants.
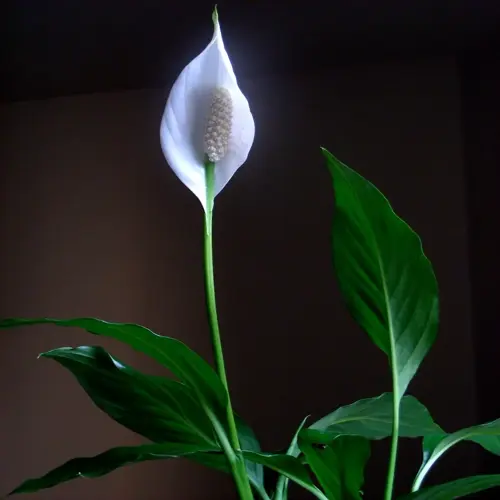
- Ideal plants: Hostas, daylilies, irises, ornamental grasses, peace lilies, and most clumping perennials divide cleanly.
- Time to recover: Divided sections re-establish within 4 to 8 weeks during the active growing season.
- Difficulty: Easy and nearly foolproof; NC State recommends dividing iris every 3 to 4 years for vigor.
- Equipment needed: A sharp spade or knife, gloves, and pre-prepared planting holes for the new divisions.
- Beginner tip: Divide in early spring or fall when plants are dormant and stress from root disturbance is minimal.
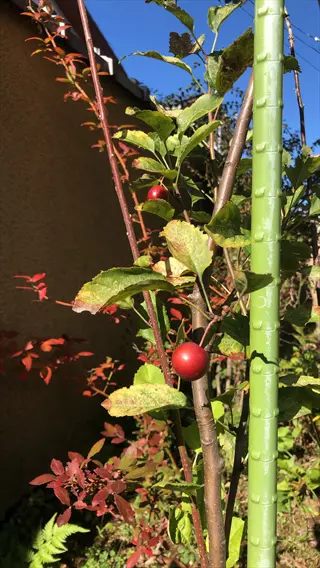
Grafting and Budding
- Definition: Joining a scion (top portion) of one plant to the rootstock of another so the tissues fuse and grow together.
- Ideal plants: Apples, pears, citrus, roses, Japanese maples, and cacti like the Moon cactus benefit from grafting.
- Time to heal: Successful grafts callus over in 2 to 6 weeks; full union takes a full growing season.
- Difficulty: Advanced; requires matching cambium layers precisely and is the hardest method for beginners to learn.
- Equipment needed: Grafting knife, parafilm wrap, grafting tape, and compatible rootstock matching your scion species.
- Beginner tip: Try whip-and-tongue grafting on dormant apple twigs after watching multiple video tutorials before attempting alone.
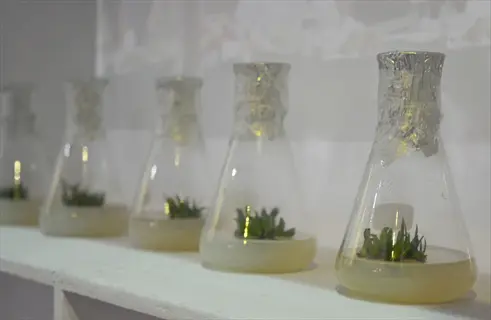
Tissue Culture
- Definition: Growing new plants from microscopic tissue samples in sterile laboratory conditions using nutrient-rich gel media.
- Ideal plants: Orchids, ferns, bananas, blueberries, and rare or patented cultivars are mass-produced through tissue culture.
- Time to plantlet: Initial cultures form callus in 4 to 8 weeks; transferable plantlets in 4 to 6 months.
- Difficulty: Expert level; requires sterile flow hoods, hormone-balanced media, and contamination-free technique throughout.
- Equipment needed: Laminar flow hood, autoclave, agar medium, plant growth regulators, and a dedicated clean workspace.
- Beginner tip: Skip this at home; instead, buy tissue-cultured starts of rare plants like Monstera Thai Constellation from reputable nurseries.
When I started, I used stem cuttings since the gear was cheap. Division and layering also fit new growers. Grafting and tissue culture need years of practice or a clean lab.
Leaf cuttings work for a small group of plants. Micropropagation stays out of reach for home growers. The other six count as vegetative propagation. They cover most of the plants you grow.
Choose the Right Method
In my experience, picking the right method matters more than buying fancy gear. You would never boil a steak or grill an egg. Choosing the wrong propagation method fails just as fast.
Most guides list the seven methods. They never tell you which propagation method to pick. The chart below fixes that. You can see the best propagation method for your plant, your skill level, and your time.
Water propagation wins on social media for good reason. You can see roots form each day. But soil propagation often makes stronger plants. The water vs soil propagation call comes down to the plant and your patience.
I always tell new growers to start in the easy green rows. Easy plant propagation wins build the skill you need for harder methods. Try seeds, division, or stem cuttings first.
Propagation for beginners should match plant to method, not the other way around. A snake plant wants leaf cuttings. A hosta wants division. Force the wrong propagation difficulty on a plant and you will lose it.
Tools Media and Setup
Your propagation media acts like a hospital bed for plant babies. It should be clean and snug. It should give the right hold without smothering the cutting.
I learned the hard way to skip garden soil. Penn State warns it brings pathogens and weed seeds into your tray. Sterile tools, a clean rooting medium, and a dab of rooting hormone save you from week three rot. Each tool below earns its place in my setup.
Propagation Media
- Water: Inexpensive and visible; ideal for pothos, monstera, and philodendron but produces weaker, water-adapted roots.
- Perlite: Lightweight volcanic glass that provides excellent drainage and air; reusable after sterilization with boiling water.
- Vermiculite: Holds moisture better than perlite; ideal for moisture-loving cuttings but compresses with overuse over time.
- Sphagnum moss: Sterile, acidic, and excellent for air layering per UF/IFAS; pre-soak before wrapping around wounded stems.
- Sand: Coarse builder sand offers superior drainage for cacti and succulents but provides zero nutrient retention.
- Bark or coir: Both reduce peat use and resist compaction; ideal for orchids and long-term cutting beds.
Cutting Tools and Sterilization
- Bypass pruners: Make clean angled cuts that heal quickly; choose forged steel models that hold a sharp edge longer.
- Sharp knife or razor: Essential for leaf cuttings, grafting, and air layering wounds where precise tissue cuts are required.
- Sterilization solution: Per NC State, mix 1 part chlorine bleach to 9 parts water and soak tools or containers 5 minutes.
- Alcohol wipes: Quick between-cut sterilization using 70% isopropyl alcohol prevents pathogen transfer between plants.
- Flame sterilization: Pass blades through a flame for grafting work to eliminate viruses and bacteria instantly.
- Dedicated tools: Keep propagation tools separate from outdoor pruners to prevent cross-contamination with garden pathogens.
Rooting Hormones
- IBA (indole-3-butyric acid): Per Missouri Extension, the most common synthetic auxin in powdered and liquid commercial rooting products.
- IAA (indole-3-acetic acid): The natural plant auxin that all plants produce; less stable than IBA in commercial formulations.
- NAA (naphthaleneacetic acid): A stronger synthetic auxin used primarily for woody and difficult-to-root species like camellia.
- Powder form: Easiest for beginners; dip moistened cutting base, tap off excess, and insert into rooting medium immediately.
- Gel and liquid: Provide more consistent coverage; ideal for delicate or hairy stems that powder cannot coat evenly.
- Natural alternatives: Willow water, honey, and aloe contain mild rooting compounds but work slower than commercial hormones.
Humidity and Light Setup
- Humidity dome: Clear plastic cover holds moisture around cuttings; vent daily for 10 minutes to prevent fungal growth.
- DIY humidity tent: UF/IFAS suggests plastic bags, clear bins, or inverted bottles as free alternatives to commercial domes.
- Fluorescent or LED lights: Per Missouri Extension, use 2 by 40-watt bulbs giving 14 to 16 hours of daily light.
- Heat mat: Maintains rooting medium at 75 to 80 degrees Fahrenheit (24 to 27 degrees Celsius) per Penn State recommendations.
- Mist system: Automated misters create ideal humidity for hardwood cuttings; UF/IFAS notes mist beds suit large operations.
- Bottom watering tray: Wick moisture upward to prevent disturbing seeds or dislodging fresh cuttings from rooting media.
Keep your rooting medium moist but not soaked. Penn State suggests a pH at or below 6.5. A heat mat that holds 75 to 80 degrees Fahrenheit (24 to 27 degrees Celsius) speeds root growth on most cuttings.
For sterile gear, mix 1 part bleach with 9 parts water. Soak tools and pots for 5 minutes per NC State. A humidity dome or a clear plastic bag does the same job for less than a buck.
Step by Step Process
How to propagate plants works a lot like baking bread. The timing of each step matters more than any one tool. Rush a stage and you ruin the whole batch.
I once tried to skip the hardening off step. My basil cuttings wilted in two hours of full sun. The five phases below walk you from parent plant to transplanting seedlings. Each stage builds on the one before it.
Hold your germination zone between 65 and 75 degrees Fahrenheit (18 and 24 degrees Celsius) per NC State. Most seeds wake up in this range. Penn State adds one more rule: start with disease-free parent plants.
Phase 1 Choose a Healthy Parent
- Health check: Per Penn State, begin with plants that are disease-free, insect-free, stress-free, and not water-deprived or overheated.
- Timing: Take cuttings during active growth in spring or early summer when plants channel energy into new tissue formation.
- Avoid dormancy: Skip winter propagation for most species; cuttings taken during dormancy root slowly or rot in cold media.
- Mature wood: Choose stems that are 6 months to 1 year old for woody cuttings to balance flexibility and energy reserves.
- Morning harvest: Take cuttings early in the morning when plants are fully hydrated from overnight transpiration recovery.
- Non-flowering shoots: Avoid stems with flower buds because the plant directs energy to blooming instead of root production.
Phase 2 Make the Cut
- Cut length: Per NC State, take 4 to 6 inch (10 to 15 centimeter) stem cuttings or 3 to 5 inch (8 to 13 centimeter) for herbaceous plants.
- Node placement: Cut just below a node where root primordia concentrate; ensure 2 to 3 nodes remain on the cutting.
- Cut angle: Use a 45 degree angle to maximize exposed cambium surface area for hormone absorption and root initiation.
- Leaf removal: Strip lower leaves to expose nodes and prevent rot; keep 2 to 4 upper leaves for photosynthesis.
- Sterile blade: Sterilize between cuttings with bleach solution per NC State or 70% isopropyl alcohol between cuts.
- Optional wound: Scrape a small strip of bark from woody cuttings to expose more cambium for root development.
Phase 3 Apply Hormone and Plant
- Dip in hormone: Moisten cut end, dip into rooting hormone powder, then tap off excess to leave a thin even coat.
- Pre-poke holes: Use a pencil to make planting holes so the hormone is not scraped off during insertion.
- Insert depth: Plant cuttings deep enough to bury 1 to 2 nodes where roots will emerge from leaf scar tissue.
- Firm gently: Press medium around the cutting to eliminate air pockets and ensure consistent moisture contact with stem.
- Water in: Bottom-water trays or mist top lightly; avoid blasting cuttings with a heavy stream that dislodges them.
- Label everything: Mark date, species, and method on a waterproof tag so you can track success rates over time.
Phase 4 Provide the Right Environment
- Temperature: Per Penn State, hold rooting media between 75 and 80 degrees Fahrenheit (24 and 27 degrees Celsius) using a heat mat.
- Humidity: Cover with a dome or clear bag; vent daily for 10 minutes to refresh air and prevent fungal growth.
- Light: Provide bright indirect light; Missouri Extension recommends 14 to 16 hours daily from fluorescent or LED bulbs.
- Air circulation: Run a small fan on low setting to strengthen stems and reduce damping off fungus on seedlings.
- Moisture check: Keep medium consistently moist but never waterlogged; squeeze test should produce one drop of water.
- Patience: Resist pulling on cuttings to check for roots; wait 3 to 6 weeks before testing with a gentle tug.
Phase 5 Transplant and Harden Off
- Root readiness: Per UC ANR, transplant once 2 to 3 true leaves emerge or roots reach 1 to 2 inches (2.5 to 5 centimeters) long.
- Pot up gradually: Move into a 4 inch (10 centimeter) pot first before transitioning to larger containers as roots fill.
- Hardening off: Per NC State, begin at least 2 weeks before outdoor planting by exposing plants to outside conditions briefly.
- Temperature protection: Do not expose to temperatures below 45 degrees Fahrenheit (7 degrees Celsius) or to strong wind.
- Daily progression: Increase outdoor exposure by 1 to 2 hours per day, starting in shade and gradually adding direct sun.
- Final transplant: After hardening, plant in final location on a cloudy day or in the evening to reduce transplant shock.
Propagation timing trips up most new growers more than any other step. Wait for the true leaves to show before you move a seedling. Cotyledons come first but they are not the real leaves.
Taking cuttings in the morning gives the best results. The plant is full of water from the night. Rooting cuttings then have the moisture they need for the first few days alone.
Best Plants for Beginners
Beginner plants work like training wheels. Pothos and spider plants forgive the kind of slip-ups that kill a finicky fern. I tested every plant on the list below for at least two full rooting cycles.
Best plants to propagate rank high on three traits. They root fast, they shrug off rookie mistakes, and they cost almost nothing to start. Water propagation wins with picks like pothos and philodendron. They now rule social media for that very reason.
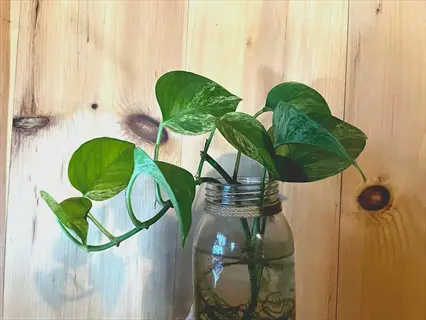
Pothos
- Method: Stem cuttings in water; place 4 to 6 inch (10 to 15 centimeter) sections with 2 nodes in a clear jar.
- Time to root: Visible roots appear within 7 to 14 days; transplant to soil at 2 inches (5 centimeters).
- Difficulty: Beginner; succeeds in low light, hard water, and intermittent neglect that kills most other propagations.
- Why it works: Pothos produces aerial roots at every node, primed to grow once submerged in water or pressed into moist soil.
- Common varieties: Golden, marble queen, neon, satin, and pearls and jade pothos all propagate using identical methods.
- Beginner mistake to avoid: Do not let the cutting dry between water and soil transitions or new roots shrivel within hours.
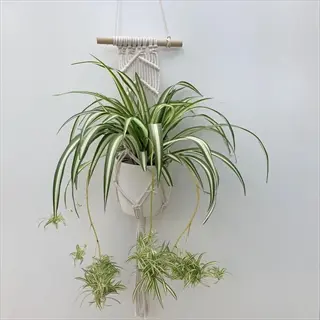
Spider Plant
- Method: Natural layering of plantlets per Penn State; pin baby spiderettes into adjacent pots while attached to mother.
- Time to root: Roots establish in 2 to 3 weeks; cut connecting runner once new growth appears on the plantlet.
- Difficulty: Beginner; the plant essentially propagates itself with zero hormone or special setup required for success.
- Why it works: Spider plant runners already carry root nodules; contact with moist soil triggers immediate root expansion.
- Common varieties: Variegated, curly bonnie, reverse variegated, and solid green all produce identical plantlet runners.
- Beginner mistake to avoid: Do not separate plantlets too early; wait until at least 3 leaves and visible white roots.
Philodendron
- Method: Stem cuttings in water or soil; take 4 to 6 inch (10 to 15 centimeter) sections below an aerial root node.
- Time to root: Water roots appear in 10 to 14 days; soil rooting takes 3 to 4 weeks with humidity.
- Difficulty: Beginner; tolerates underwatering, low light, and rough handling during the rooting phase consistently well.
- Why it works: Aerial roots along the stem activate immediately when exposed to moisture and develop into full root systems.
- Common varieties: Heart-leaf, brasil, micans, birkin, and pink princess all propagate using identical stem cutting methods.
- Beginner mistake to avoid: Do not cut between nodes; cuts must be just below a node where aerial roots concentrate.
Snake Plant
- Method: Leaf section cuttings in soil or water; slice mature leaves into 2 to 3 inch (5 to 8 centimeter) segments.
- Time to root: Pups form in 6 to 10 weeks; the original leaf cutting persists while new plants emerge from the base.
- Difficulty: Beginner; tolerates extreme neglect, low light, and inconsistent watering throughout the entire rooting process.
- Why it works: Snake plant tissues are highly regenerative; even small segments produce rhizomes that develop full plants.
- Common varieties: Laurentii, moonshine, cylindrica, and zeylanica all propagate from leaf sections, though variegation may fade.
- Beginner mistake to avoid: Track which end was original bottom; planting upside down prevents rooting completely.
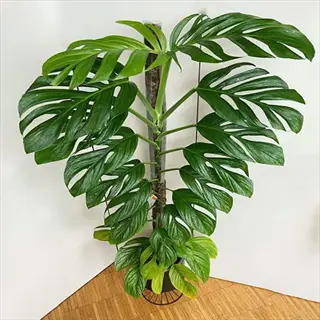
Monstera Deliciosa
- Method: Stem cuttings in water or sphagnum moss; cut just below an aerial root with at least one node and leaf.
- Time to root: Strong roots develop in 3 to 6 weeks; transition to soil once roots reach 3 inches (8 centimeters) long.
- Difficulty: Beginner to moderate; the main challenge is patience because cuttings sulk for weeks before visible action.
- Why it works: Existing aerial roots quickly activate in water and the stem nodes produce additional roots over time.
- Common varieties: Standard deliciosa, adansonii, and the rare Thai Constellation all propagate identically from nodal cuttings.
- Beginner mistake to avoid: Do not propagate from a leaf alone; without a node, the cutting will never develop roots.
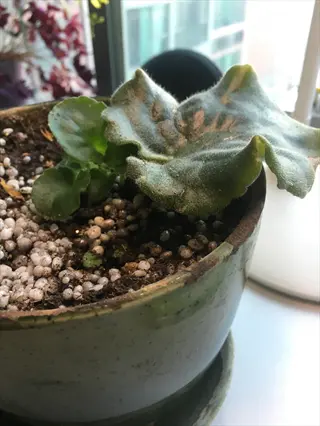
African Violet
- Method: Per UF/IFAS, leaf-petiole cuttings in water or vermiculite; insert 1 inch (2.5 centimeter) petiole at 45 degrees.
- Time to root: Roots in 3 to 4 weeks; new plantlets emerge from the petiole base in 8 to 12 weeks.
- Difficulty: Beginner; one leaf can produce 3 to 6 new plants over time, multiplying your collection rapidly.
- Why it works: Petiole tissue contains active meristem cells that differentiate into new root and shoot tissues simultaneously.
- Common varieties: Standard, miniature, semi-miniature, and trailing varieties all propagate identically from healthy outer leaves.
- Beginner mistake to avoid: Do not let new plantlets grow attached too long; separate when leaves reach 1 inch (2.5 centimeters).
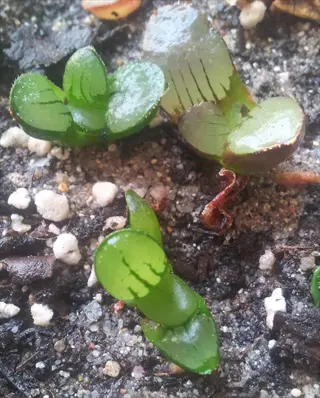
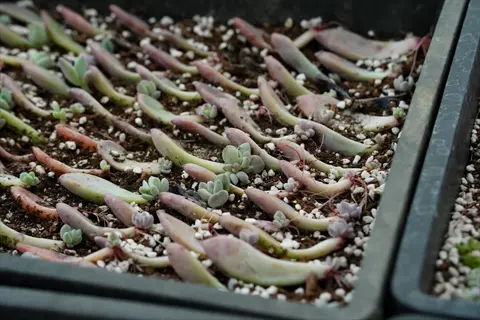
Succulents
- Method: Leaf or stem cuttings on dry soil; let cut ends callus for 2 to 4 days before placing on moist medium.
- Time to root: Roots emerge in 2 to 3 weeks; new pups form at the leaf base in 6 to 8 weeks.
- Difficulty: Beginner; the only major risk is overwatering, which rots cuttings within 48 hours of contact.
- Why it works: Succulent leaves store water and nutrients independently, sustaining themselves while developing new roots and shoots.
- Common varieties: Echeveria, sedum, graptopetalum, and jade plant all propagate identically from individual healthy leaves.
- Beginner mistake to avoid: Do not water until roots are visible; spritzing only after roots reach 0.25 inches (0.6 centimeters).
Coleus
- Method: Stem cuttings in water or soil; take 4 inch (10 centimeter) sections from non-flowering shoots in summer.
- Time to root: Roots in just 5 to 10 days; one of the fastest rooters in the entire propagation world.
- Difficulty: Beginner; nearly 100% success rate when basic sterilization and moisture rules are followed correctly.
- Why it works: Coleus stems contain abundant auxin and root readily without hormone, even in plain tap water on a windowsill.
- Common varieties: Wizard, kong, premium sun, and trailing types all propagate identically and overwinter as indoor cuttings.
- Beginner mistake to avoid: Pinch off flower spikes before propagating; flowering shifts the plant's energy away from rooting.
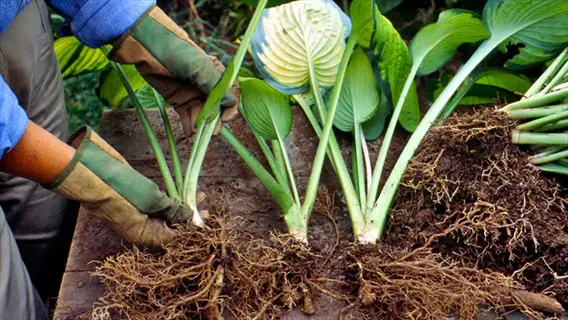
Hosta
- Method: Division in early spring or fall; lift the entire clump and split with a sharp spade into 3 to 5 sections.
- Time to recover: Divisions establish within 4 to 6 weeks during the active growing season after replanting at the same depth.
- Difficulty: Beginner; hostas are nearly impossible to kill through division and benefit from being split every 3 to 4 years.
- Why it works: Each hosta crown contains multiple growth points called eyes, each capable of forming an independent plant.
- Common varieties: Sum and Substance, June, Patriot, and Empress Wu all divide using the identical lifting and splitting method.
- Beginner mistake to avoid: Do not divide during summer heat; transplant shock plus heat stress causes major leaf scorch.
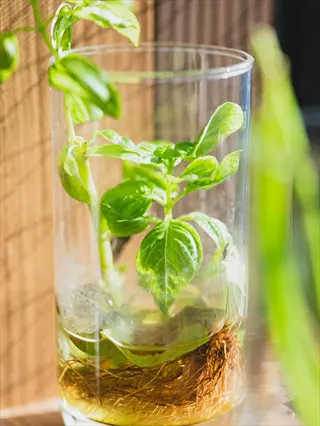
Basil
- Method: Stem cuttings in water; take 4 inch (10 centimeter) tip cuttings, strip lower leaves, and place in glass jar.
- Time to root: Roots in 7 to 10 days; the fastest edible plant to propagate from store-bought grocery stems.
- Difficulty: Beginner; you can multiply one grocery store basil bunch into 5 to 10 plants for a full herb garden.
- Why it works: Basil stems produce roots from any submerged node and tolerate transplanting once roots reach 1 inch (2.5 centimeters).
- Common varieties: Genovese, Thai, lemon, purple, and cinnamon basil all propagate identically using fresh non-flowering stem tips.
- Beginner mistake to avoid: Do not let cuttings sit in stagnant water; refresh every 3 days to prevent slimy root rot.
Start with easy plant propagation picks like pothos or basil. A first win builds the trust you need to try harder plants. Houseplant propagation scales fast once you nail the basics.
Most of these plants thrive with propagation for beginners in mind. They take low light, hard water, and the odd missed water day. Pick two or three from the list and try them side by side.
Fix Common Propagation Mistakes
Fixing propagation problems works a lot like a doctor visit. The same sign, like a limp cutting, can come from many causes. Each cause needs a different fix.
I have made every mistake in the chart below at least once. Cuttings rotting, damping off, and root rot all hit me hard in my first year. The good news: each one has a quick fix you can try today.
Most propagation mistakes trace back to three causes. You skipped tool sterilization, you started in winter, or you watered too much. Fix any one and your cutting wilting rate drops by half.
When you see why cuttings fail, look at the base first. A mushy stem means rot. A dry stem means low humidity. Each clue points to one of the fixes in the chart above.
5 Common Myths
All plants root faster in water than in soil because they get constant hydration and visible progress.
Water roots are weaker and adapted to liquid, so plants transitioned to soil often struggle with shock and dieback.
Rooting hormone is required for any successful cutting and skipping it guarantees that the propagation will completely fail.
Many easy plants like pothos and coleus root readily without hormone, though it accelerates rooting in woody species.
You can propagate any plant from a single leaf if you simply place that leaf in moist potting soil.
Only specific plants like succulents, African violets, and begonias regenerate from leaves; most species need stem tissue.
Bigger cuttings always root better and produce stronger new plants than smaller cuttings of the same species.
Smaller cuttings of 4 to 6 inches (10 to 15 centimeters) root faster because they support less foliage with limited roots.
Propagated plants are genetically inferior copies that lose vigor and produce weaker offspring after just a few generations.
Vegetatively propagated plants are exact clones with identical traits and vigor, which is why commercial growers rely on them.
Conclusion
You started this guide unsure where to begin. Now you have the seven core propagation methods, a chart to pick the right one, and a fix for each common mistake. Plant propagation is no longer a black box for you.
NC State calls propagation both art and science. It takes skill, hand work, and real time at the bench. When I first started, I killed many cuttings. In my experience, every loss taught me what the books left out. Mistakes are part of the path, not a sign to quit.
Pick one plant from the beginner list and start this week. A pothos in a glass jar can be your first win. This plant propagation guide gives you the chart, the workflow, and the fix-it tips. Small wins build the trust you need for hard propagation methods down the road.
Look for a local plant swap to share your wins. Start a journal to track what works. Propagation for beginners scales fast once you log a few results.
Now 66% of Americans own houseplants. The USDA holds nearly 3,000 native plant protocols. You join a 30-year tradition. Multiplying plants is a great way to share joy and cut waste. Your first cutting starts your path as a real vegetative propagation grower.
External Sources
Frequently Asked Questions
What is the propagation of a plant?
Plant propagation is the process of producing a new plant from an existing one using seeds or vegetative parts.
Do plants lower cortisol?
Yes, research suggests indoor plants can reduce cortisol levels and lower physiological stress responses in humans.
What is the best way to propagate plants?
The best methods vary by species:
- Stem cuttings for most houseplants
- Division for clumping perennials
- Seeds for annuals and vegetables
- Air layering for thick-stemmed tropicals
What are the 7 methods of propagation?
The seven methods are:
- Seeds
- Stem cuttings
- Leaf cuttings
- Layering
- Division
- Grafting
- Tissue culture
What are the 4 types of propagation?
The four main types are:
- Sexual propagation through seeds
- Cuttings from stems, leaves, or roots
- Layering while attached to parent
- Division of mature root clumps
How to define propagation?
Propagation is the process of multiplying plants by sexual reproduction with seeds or asexual reproduction with plant parts.
Why is Gen Z obsessed with plants?
Gen Z embraces plants for mental wellness, sustainability values, affordable home decor, and connection to nature during digital fatigue.
What is the 3 3 3 rule for stress?
The 3-3-3 rule grounds you during anxiety:
- Name three things you see
- Name three sounds you hear
- Move three parts of your body
Can plants feel pain when cut?
Plants lack a nervous system and brain, so they cannot feel pain in the way humans or animals experience it.
What are common propagation mistakes?
The most frequent mistakes include:
- Using contaminated garden soil as media
- Taking cuttings during winter dormancy
- Skipping tool sterilization steps
- Transplanting seedlings too early
- Overwatering rooting cuttings