Houseplant · Araceae
Black Velvet Elephant Ear
Alocasia reginula 'Black Velvet'
A pint-sized jewel alocasia flaunting velvety black leaves and silver veins that pays back an attentive grower.
Bright indirect
USDA 10–12
18 in · 46 cm
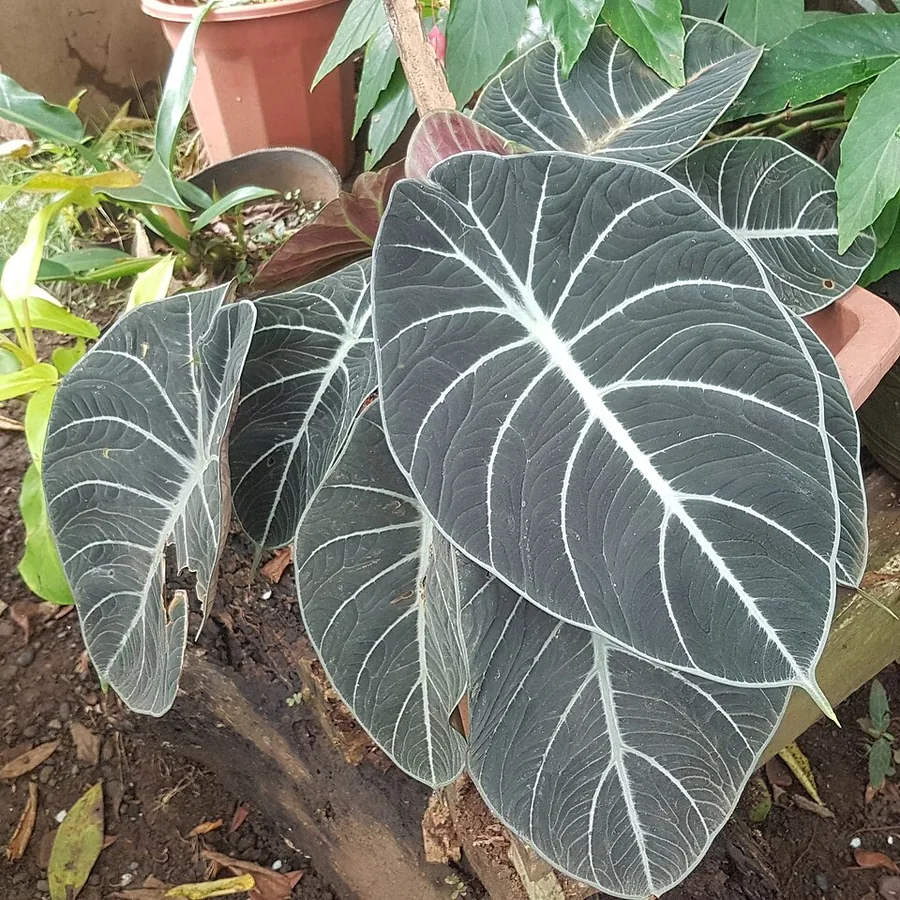
Overview
Black Velvet ranks among the petite jewel alocasias, treasured for its thick, almost-black leaves laced with bright silver veins. It stays small, topping out near 18 inches (46 cm), so it earns a spot on a table rather than looming like the giant elephant ears most folks imagine. It sits in the aroid family and hails from the rainforests of Borneo.
Growers who enjoy a worthy challenge will love this one. It grows slowly, shrinks from cold, and rots the instant the soil turns soggy, so the whole craft lies in sensing what it wants and going easy on the water. Nail that balance and the dark, textured leaves stand among the most eye-catching foliage you can grow indoors.
Worth flagging right away: every part carries calcium oxalate crystals that sting the mouth and skin. The plant is truly toxic to pets and risky for small children, so set it somewhere prying mouths and paws simply cannot get.
Care
The short version: give it bright indirect light, high humidity, and warmth, watering with care so the top half of the soil dries before the next drink. Overwatering wipes it out faster than anything else.
Light
Serve up bright, indirect light, the sort beside a window but shielded from blistering midday sun that would scorch the dark leaves. It copes with partial shade, though skimpy light drags down an already slow grower and mutes that velvety tone.
Water
Watering is the trap that claims most of these plants. Wait for the top half of the soil to dry before the next drink, and back off through winter, since the genus rots quickly when left wet. Never let the pot sit in a saucer pooled with water.
Soil
Reach for a moist but well-drained, organically rich mix that grips a little moisture without turning to muck. Any pH from 5.0 to 8.0 suits it, yet drainage counts far more than the precise figure, because dense water-logged soil is exactly what kicks off root rot.
Humidity
Count this as a high-humidity plant, thriving in the kind of damp air a rainforest floor delivers. Parched indoor air strains it and lures spider mites, so a humid corner, a pebble tray, or a small humidifier pays off handsomely.
Feeding
Feed it through the active spring and summer stretch and taper off or quit entirely during winter dormancy. A seasonal feeding rhythm fits it well, since piling food on a resting plant achieves nothing.
Pruning
No shaping is called for here. Simply clip away dead, yellowed, or damaged leaves as they turn up to keep things neat and shrink the hideouts pests rely on.
Repotting
Repot only when it plainly demands it, since this cultivar bristles at disturbance and creeps along slowly. Spring or summer is the moment, teamed with division if more plants appeal, and fresh fast-draining mix each round helps fend off rot.
Overwintering
Ahead of the first fall frost, shift pots to a humid, cool spot around 60°F to 65°F (16°C to 18°C) and trim the watering down. Freezing takes out the foliage, yet the plant can ride out winter at rest and push new leaves once warmth returns.
Size & spacing
Plan on a compact plant reaching up to about 18 inches (46 cm) tall when mature. Its slow pace and small frame slot it neatly onto a shelf or tabletop instead of the floor.
Troubleshooting
Nearly every trouble with this plant traces back to water, humidity, or cold. Read the leaves and the soil side by side, since one symptom can signal too much water or too little air. Spot what matches below, then move on it before it spreads.
Drooping, yellow, mushy growth that flops over while the soil stays wet
You are looking at root rot, which nearly always starts with too much water held in a heavy mix. Slide the plant from its pot and study the roots, since rotted ones go brown, black, and soft. Pull back on water at once, snip away the rotted roots along with any collapsed growth, and settle the plant into fresh, gritty medium that drains fast.
Fix:
- Reduce watering immediately
- Repot into fresh, gritty, fast-draining medium
- Remove rotted roots and any collapsed growth
Brown blotches forming on foliage while the soil stays soggy
Leaf spots crop up where the soil never gets a chance to dry, and NC State groups them with root rot as a flag for overwatering. Stretch out the time between waterings, sharpen up drainage and airflow, and strip off the worst foliage. Stopping water from lingering on the leaves is the most dependable way to halt fresh spots.
Fix:
- Reduce watering frequency
- Improve drainage and air circulation
- Remove badly affected leaves
Delicate webbing and a dusty, speckled film over the foliage
That signals spider mites, a frequent visitor on indoor plants once the air dries out. Flip the leaves and scan the undersides for the minute mites and their webbing, which spreads quickly in low humidity. Hose down the foliage, push the humidity up around the plant, and keep treating until every mite clears out.
Fix:
- Rinse foliage
- Raise humidity
- Treat as appropriate for spider mites
Sticky film and cottony fluff tucked into the leaf joints
That signals mealybugs, often paired with scale, and both gravitate toward plants kept indoors. Peer into the leaf axils and undersides where the white cottony clusters gather. Swab away everything you can spot and treat the rest, then keep checking the plant so a few survivors never rebuild.
Fix:
- Wipe off visible pests
- Treat infestation as appropriate
Foliage fading away as the cold sets in
More often than not this is cold damage and natural dormancy, not a plant on its way out. A freeze does kill the leaves, yet in mild zones the plant pushes back from the base once warmth returns, and potted ones carry through winter indoors just fine. Shift pots to a humid, cool spot around 60°F to 65°F (16°C to 18°C) ahead of frost, ease back on water, and let it rest until growth restarts.
Fix:
- Bring pots indoors before frost to a humid, cool spot around 60-65°F
- Reduce watering over winter
- Allow the plant to rest and resume growth when warmth returns
Toxicity
Handle this as a toxic plant through and through. Every part packs insoluble calcium oxalate crystals, microscopic needles that scorch the mouth and throat when chewed and turn skin red and itchy wherever the sap lands. Keep it well clear of pets, livestock, and small children, and scrub your hands once you have handled it.
Toxic to
Cats · Dogs · Horses · Rabbits · Livestock · Birds · People
Cats Moderate
A cat that chomps a leaf reacts within moments. Look for a burning mouth, swollen lips, tongue, and throat, plenty of drooling, vomiting, and a struggle to swallow.
Dogs Moderate
Any part a dog chews triggers the same stinging response, bringing a puffy, sore mouth, drooling, pawing at the muzzle, vomiting, and trouble getting food down.
Horses Moderate
The oxalate crystals leave horses with a raw, swollen mouth and throat plus drooling and a hard time swallowing. Position the plant far from any grazing animal.
Rabbits Toxic
Those same burning crystals make the plant unsafe for rabbits, so block them from nibbling the leaves entirely.
Livestock Toxic
Cattle, goats, and sheep face the same danger. The calcium oxalate irritates the mouth and gut, so the plant belongs nowhere near grazing ground.
Birds Toxic
The crystals can hurt pet birds as well, so keep cages and perches well clear of the foliage.
People Caution
No part of this plant should ever reach a plate. A bite delivers a burning, swollen mouth, and the sap can turn skin red and itchy, so scrub your hands after handling and keep it away from small children.
All parts contain calcium oxalate crystals; sap can cause contact dermatitis.
Helpline numbers

United States
ASPCA Animal Poison Control: (888) 426-4435 (fee applies)
Poison Control: (800) 222-1222



Canada
Poison Centres: 1-844-764-7669
How to propagate
One dependable method makes more of this plant, and it asks for a careful touch rather than any rare talent.
DivisionModerate
Spring to summer · Several weeks
Division is your best route, and NC State recommends separating offsets as the go-to method for alocasia. Tackle it in spring or summer while the plant is growing actively. Lift it out, gently work the rhizomes and offsets apart, pot up each piece, and allow several weeks for it to anchor and root before fresh top growth shows up.
Myths
When an alocasia sheds its leaves in winter, it has died for good.
Cold air and natural dormancy pull the foliage back, which looks worrying but seldom spells the end. Freezing does take out the leaves, yet in mild zones the plant resprouts from the base when warmth returns, and a potted one moved indoors comes back too. Let it rest and hold off before giving up on it.