Bulb · Araceae
Caladium
Caladium bicolor
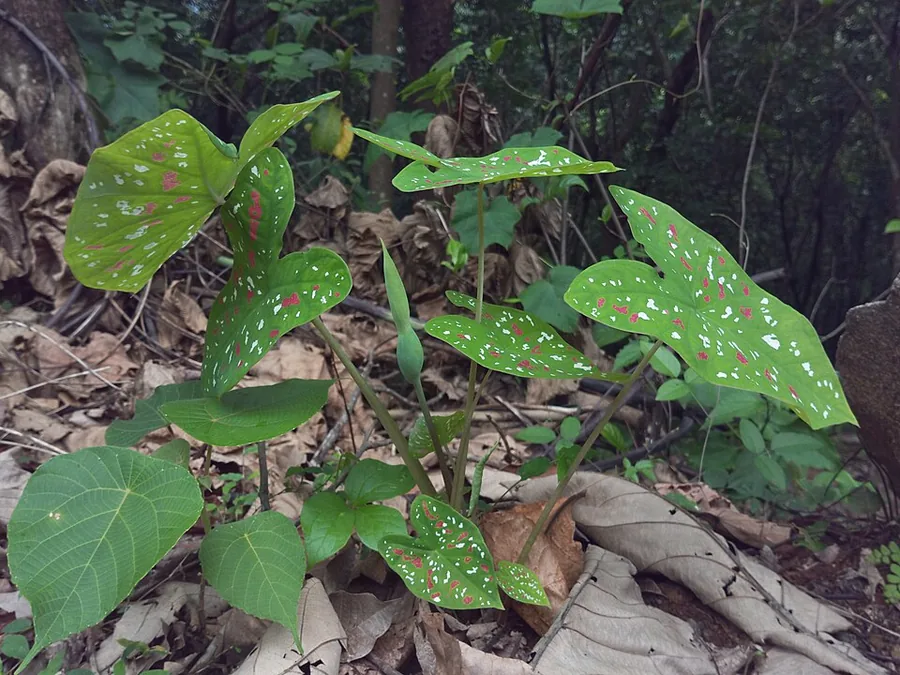
Hand it warm soil, dappled shade, and steady moisture, and caladium rewards you with heart-shaped foliage streaked in red, pink, and white.
Partial shade
Every 2–4 days
61–86°F · 16–30°C
60–90 days
Overview
The draw with caladium is all in the foliage, since the flowers barely register. Fire up one tuber and it launches big, paper-thin, heart-shaped leaves marbled in red, pink, white, and green, enough to bring a dull shady corner roaring back to life. It sits in the arum family alongside philodendrons and peace lilies, and it shares their appetite for warmth and humidity.
Being a tropical tuber, it runs entirely on heat. Give it that and it bursts awake, races to full size in a single season, then dies back to rest once the air turns cool. Drop it into a shaded bed, load it into a patio pot, or keep it going indoors as a houseplant, but nothing happens until the soil and air climb to around 16°C and stay there.
The color is what you are growing for, and shade is what guards it. Blast it with strong sun and the vivid markings bleach to plain green while the tender leaves scorch, but dappled light holds every shade bright. None of this is hard once the warmth shows up; caladium just asks you to nail that single detail.
Care
The short version: aim for partial to dappled shade, warm soil that never goes cold, and steady moisture across the whole growing season. Feed with a light hand, push the humidity high, and back off the water once the leaves yellow toward dormancy.
Light
Chase partial to dappled shade, something like 2 to 4 hours of soft sun, and shield it from fierce afternoon rays. Overdo the direct sun and the bright markings drain to green while the thin leaves burn, whereas deeper shade pumps the color up to its richest.
Water
In full growth caladium is a heavy drinker, so keep the soil evenly moist to the touch and never sodden, because waterlogged ground will rot the tubers. A soak every 2 to 4 days works for most, and you dial it right back as the leaves yellow into dormancy.
Soil
Set it in fertile, free-draining soil packed with organic matter so moisture lingers without the roots sitting wet. A mildly acidic pH of 5.5 to 6.0 is the target, and sharp drainage is your best defense against tuber rot.
Temperature
Everything hinges on warmth. Caladiums power along between 61°F and 86°F (16°C to 30°C) and grind to a halt below that, so hold off until the soil heats up before the tubers head outside.
Humidity
As tropical plants they crave humidity of 60% or more. Parched indoor air crisps the leaf edges brown, so cluster your plants together, park them on a pebble tray, or fire up a humidifier wherever the air runs dry.
Feeding
Offer a balanced liquid fertilizer every two weeks right through the growing season, or swap in a slow-release low-phosphorus formula. Keep it light, since heavy feeding washes the reds and whites back to green.
Pruning
Pruning barely enters into it. Clip away any yellowing or damaged leaves at the base, and snip out the central bud on a tuber before planting to coax out extra shoots and leaves.
Repotting
Rather than potting on, caladiums get replanted yearly from stored tubers, and settled clumps do best left alone. Only lift and divide once the tubers crowd and heave up at the surface or the leaves start shrinking through the season.
Size & spacing
Expect a plant that reaches 12 to 30 inches (30 to 76 cm) tall and spreads about as wide. Space the tubers 8 to 12 inches apart to give those broad leaves room to unfurl.
When to plant
Heat calls the shots for caladiums, never the date on the wall. Fancy a jump on the season? Sprout the tubers indoors a few weeks before the last frost, then send them outside only after the soil has properly warmed in late spring. They bulk up all summer and fold back down as things cool.
Northern hemisphere
Southern hemisphere
Typical months for a temperate climate: start earlier in warm zones, later where spring frosts linger.
- Sow: Start tubers indoors 4-6 weeks before the last frost in a warm spot, keeping the medium about 70 degrees F, to get a head start in cold-winter regions
- Plant: After all danger of frost has passed and soil reaches at least 60-70 degrees F (late spring to early summer)
- Harvest: Grown for foliage, which reaches full size in one season; insignificant arum-type spathe flowers may appear in summer
Hardiness
USDA hardiness zones: 9–10
Temperature: down to -7°C
Troubleshooting
Caladium hiccups cluster around two things: tubers that stay stubbornly asleep in cold ground, and leaves that fade or get nibbled. Spot the early clues and you can shut most problems down fast. Find your symptom below and jump on it before the season slips away.
Tubers that rot in place instead of pushing up shoots
Nine times out of ten, cold and soggy soil is why tubers stall or rot before a shoot ever appears. Wait for the ground to settle at a steady 60°F to 70°F (16°C to 21°C), then work in drainage so it stays damp but never waterlogged. Give each tuber a squeeze and bin the soft ones, and start from clean, disease-free stock to shut fungal tuber rot out of the bed.
Fix:
- Wait to plant until soil is consistently 60-70 degrees F
- Improve drainage and reduce watering so soil is moist but not saturated
- Discard soft or rotted tubers and start with disease-free stock
Bright leaf colors draining away to flat green
When the red, pink, and white splashes leach out and the blades turn green, blame too much direct sun or an overgenerous feed. Move the plant into partial or dappled shade, well clear of the scorching afternoon glare, and cut back to one or two light feeds a season. Shade is what locks the color in, so the deeper the dapple, the punchier the leaves.
Fix:
- Move to partial or dappled shade with protection from hot afternoon sun
- Reduce fertilizer to a light application once or twice in the season
Chewed-out holes and ragged margins across the foliage
Those punched holes and gnawed edges nearly always spell slugs and snails, which come out after dark and streak the leaves with glossy slime. Go out at night to pick them off or scatter bait, and strip away the damp corners they hunker down in. If the leaves look ripped rather than chewed, wind or hail is battering the brittle foliage, so tuck the plant somewhere sheltered.
Fix:
- Hand-pick slugs and snails or use baits per label
- Site out of strong wind to protect brittle leaves
Toxicity
Treat the whole plant as toxic, top to bottom. Leaves, stems, and tubers are loaded with insoluble calcium oxalate crystals that behave like microscopic needles, so one bite triggers fierce burning, drooling, and swelling through the mouth and throat. Nothing on this plant is edible, so keep it and any stored tubers clear of pets, livestock, and children.
Toxic to
Cats · Dogs · Horses · Rabbits · Livestock · Birds · People
Cats Toxic
Bite a leaf and a cat feels the sting instantly, clawing at its muzzle and drooling heavily. Swelling spreads across the lips, tongue, and throat, with vomiting and trouble swallowing close on its heels.
Dogs Toxic
Any dog that gnaws a piece cops a sharp jolt in the mouth, drooling hard as the tongue puffs up. Most quit fast, though vomiting and a lost appetite can hang on for a day.
Horses Toxic
One touch and the crystals fire up a horse's lips and mouth, sparking pain, drooling, and difficulty swallowing. A horse cannot vomit, so the irritation stays put wherever it bit the plant.
Rabbits Toxic
The same needle-like crystals hit rabbits too, searing the mouth and gut and killing their appetite. Stash the plant and every stored tuber well beyond their reach.
Livestock Toxic
Let goats, sheep, or cattle sample the leaves and they land mouth and gut irritation for their trouble. The burn strikes at once so most spit it straight back out, but keep these plants off the pasture.
Birds Toxic
Oxalate raphides scald a bird's mouth and crop exactly as they do in mammals, so never let pet birds anywhere near the leaves or sap.
People Caution
Nothing here is safe to eat. One bite sets the lips and mouth burning, with drooling and swelling on top, and the sap can turn skin itchy, so scrub your hands after handling and keep it out of children's reach.
Keep plants and stored tubers out of reach of pets and children; wash hands after handling sap.
Helpline numbers

United States
ASPCA Animal Poison Control: (888) 426-4435 (fee applies)
Poison Control: (800) 222-1222



Canada
Poison Centres: 1-844-764-7669
Varieties
There are hundreds of named caladiums out there, grouped mostly by the shape of the leaf. A handful really earn a spot on your shortlist.
Candidum
A classic among the fancy-leaved types, loved for near-white leaves threaded with strong green veining.
Pink Cloud
A named fancy-leaved cultivar on NC State's list, showing off gently pink-flushed foliage.
Lance-leaved (strap-leaved) types
Slimmer, strap-like leaves that usually top out under 12 inches tall and shrug off more sun than the broad fancy-leaved kinds.
How to propagate
Tubers are how caladiums spread, and you have two easy routes: slice a tuber into sections, or pull away the offsets a clump throws off on its own.
DivisionEasy
Late winter to early spring before planting, while tubers are dormant · 4-6 weeks to sprout in warm soil; full size in one season
Split the tubers while they lie dormant in late winter or early spring. Carve a big tuber into chunks, keeping at least one eye on each, and let the cut surfaces dry and callus. Then set them eye-side up around 2 inches deep, and in warm soil they break ground in 4 to 6 weeks and bulk up to full size inside the one season.
Offsets & pupsEasy
At lifting in autumn or replanting in spring · One growing season to reach mature size
Caladiums also spin off daughter tubers ringing the parent. Dig up the clump in autumn or when you replant in spring, break the offsets loose, and grow each on its own; it wants one full growing season to hit mature size.
Myths
Caladiums have to bake in full sun to color up.
It runs the other way. Color deepens under partial or dappled shade, whereas strong direct sun bleaches the reds, pinks, and whites to green and sears the delicate leaves.
Caladium tubers can be set out in early spring just like tough, hardy bulbs.
These are tropical plants, and cool soil makes them stall or rot. Hold the tubers back until the ground hits at least 60°F to 70°F (16°C to 21°C), which in practice lands in late spring, not on the first mild day.